


A Comprehensive Withstand Voltage Test Procedure for Household Electrical Products: Ensuring Safety and Compliance
Introduction to Dielectric Withstand Verification
The dielectric withstand voltage test, commonly referred to as the hipot (high potential) test, represents a fundamental and non-negotiable verification within the safety evaluation of household electrical products. Its primary objective is not to stress the insulation under normal operating conditions but to ascertain its ability to withstand transient overvoltages—such as those from switching surges or lightning-induced strikes—without breakdown. A failure during this test indicates a potentially catastrophic safety hazard, where live parts could become accessible to the user, leading to electric shock or fire. Consequently, this procedure is mandated by virtually every international safety standard, including IEC 60335-1, UL 60335-1, and GB 4706.1 for household appliances. The test’s criticality extends across the product lifecycle, from design validation and type testing to routine production line checks, serving as a final gatekeeper before products reach consumers.
Fundamental Principles of Dielectric Strength Assessment
At its core, the withstand voltage test applies a significantly higher-than-normal AC or DC voltage between mutually insulated conductive parts for a specified duration. The test voltage, its waveform, application time, and pass/fail criteria are meticulously defined by the relevant product standard. The underlying principle is probabilistic: insulation materials contain microscopic imperfections. Applying an elevated electric field accelerates the aging process of weak points, causing a breakdown that would otherwise occur unpredictably in the field. The test is therefore a form of accelerated life testing for insulation faults.
Two primary failure modes are monitored: flashover and breakdown. Flashover is a disruptive discharge over the surface of the insulation, often influenced by humidity and contamination. Breakdown is a puncture through the bulk of the insulating material. The test instrument must precisely detect the sudden increase in current flow that signifies either event. It is crucial to distinguish this leakage current from the inherent capacitive charging current, especially when testing products with large winding or cable assemblies, such as motors in washing machines or transformers in power adapters.
Defining Test Parameters and Applicable Standards
Establishing the correct test parameters is a prerequisite for a valid and reproducible test. These parameters are not arbitrary but are derived from the product’s rated voltage, installation category (Overvoltage Category), and the pollution degree of its intended environment.
- Test Voltage Value: Typically, the test voltage is calculated as a multiple of the working voltage plus a fixed offset. For basic insulation in a Class I appliance (earthed) designed for 230V AC supply, a common test voltage is 1250V AC or 1768V DC. Reinforced or double insulation requires higher potentials, often 2500V AC or 3536V DC. For example, the insulation between the primary and secondary circuits of a phone charger (Class II, double-insulated) must withstand this higher stress.
- Test Voltage Form: AC testing is most common as it stresses insulation in a manner similar to real-world overvoltages and tests both polarities in each cycle. DC testing is employed for products containing large capacitive elements, such as long cables or power supply filter capacitors, where AC testing would produce excessive charging current, masking the true leakage. DC tests also apply lower voltage values (√2 times the AC value) for an equivalent stress, reducing stress on components.
- Test Duration: Standard type tests often specify 60 seconds to allow time for weak spots to manifest. For 100% production line testing, a shortened duration (e.g., 1-3 seconds) is permissible to maintain throughput while still providing a meaningful safety check.
- Trip Current Limit: This is the critical failure threshold. The instrument is set to trip if the leakage current exceeds a predefined limit, typically ranging from 0.5 mA to 100 mA, depending on the standard and product. A sensitive limit (e.g., 0.5 mA) is used for medical devices, while a higher limit may be appropriate for large appliances.
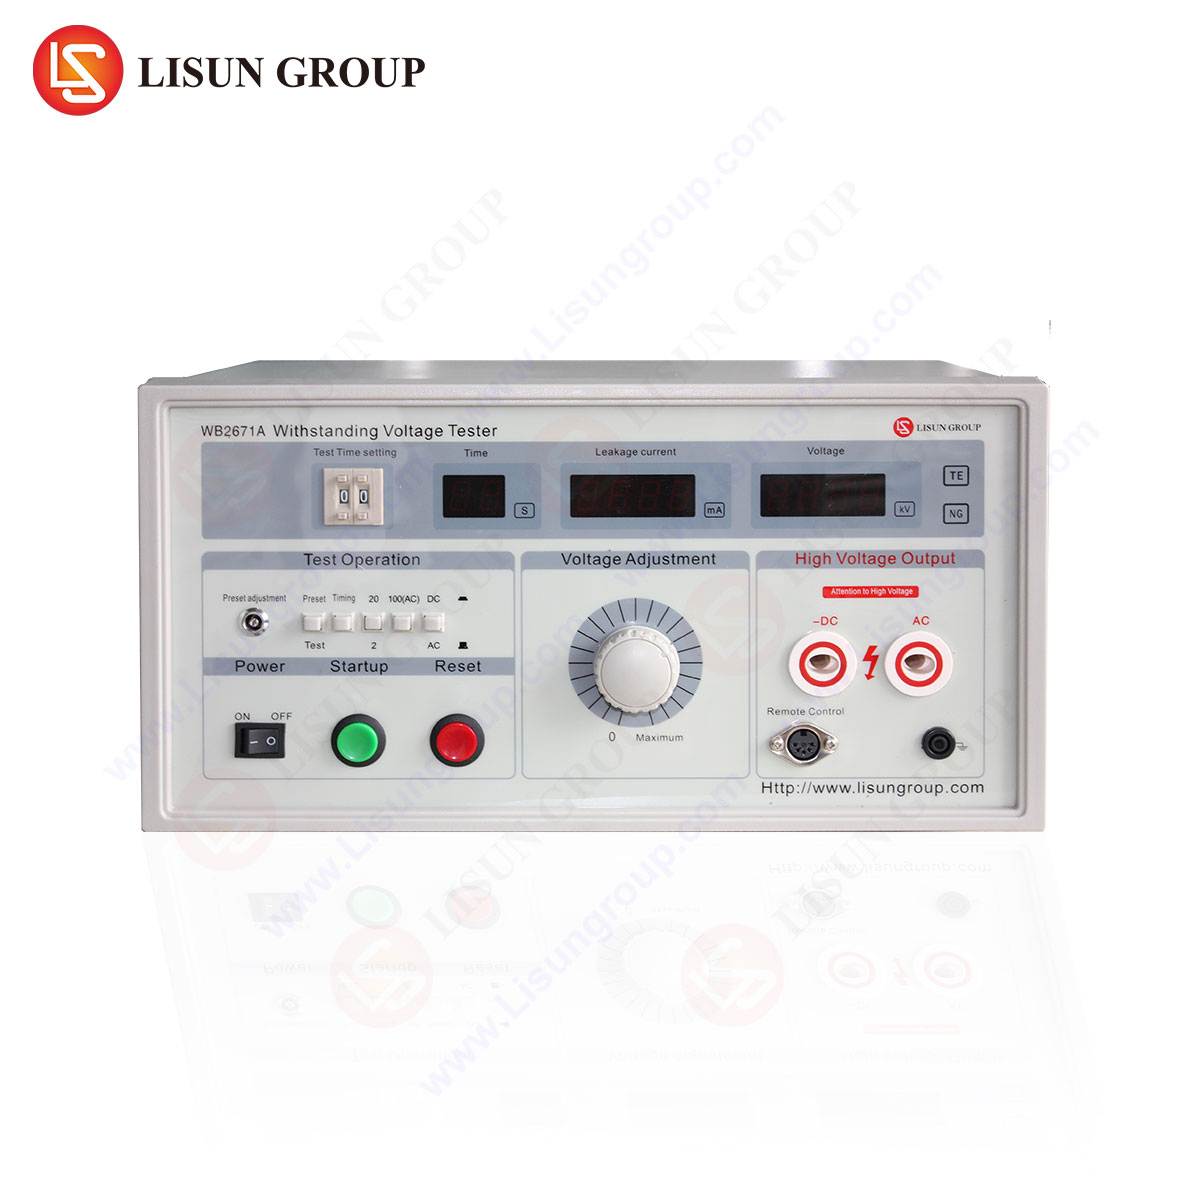
Instrumentation and System Configuration: The Role of the WB2671A Withstand Voltage Tester
Accurate, reliable, and safe test instrumentation is paramount. The LISUN WB2671A Withstand Voltage Tester exemplifies the capabilities required for modern, comprehensive testing. This microprocessor-controlled system integrates a high-voltage transformer, a precision measurement circuit, and comprehensive safety interlocks into a single benchtop unit.
The WB2671A operates on the principle of comparing the vector sum of resistive leakage current against the user-defined alarm threshold. Its key specifications facilitate rigorous testing across diverse applications:
- Output Voltage Range: 0–5 kV AC / 0–6 kV DC, suitable for the vast majority of household and commercial electrical products.
- Voltage Accuracy: ± (2% of reading + 3% of range), ensuring traceable measurements for compliance audits.
- Current Measurement Range: 0–2/20/100 mA, with a resolution of 0.1 µA, allowing for detection of minute insulation degradation.
- Arc Detection: Advanced high-frequency sampling can identify momentary breakdowns (arcing) that might not sustain a current above the overall trip limit but indicate a flaw.
- Programmable Test Sequences: Users can program ramp-up time, dwell time, and ramp-down time, which is essential for testing capacitive loads like cables or LED drivers without inrush current causing false failures.
Industry-Specific Test Applications and Methodologies
The application of the withstand voltage test varies significantly based on the product’s construction and industry.
- Household Appliances & Electrical Components: For a refrigerator, tests are conducted between the live/neutral terminals (connected together) and the accessible metal chassis (earth terminal). For a double-insulated power tool (Class II), the test is applied between the internal live parts and the external plastic housing, which is wrapped in a metallic foil to simulate a user’s hand. Switches and sockets are tested between their terminals and a metal probe placed on their external surfaces.
- Lighting Fixtures: LED drivers present a specific challenge due to their switching power supply design. Testing involves applying high voltage between the primary (mains) side and the isolated secondary (LED output) side, as well as between primary and the fixture’s metal body. The capacitive coupling in these circuits necessitates careful setting of the trip current and potentially using DC hipot.
- Automotive Electronics & Aerospace Components: While operating voltages are lower (12V/48V), these components must withstand severe transient overvoltages per standards like ISO 16750-2. Testing often involves DC hipot at levels like 500V DC between isolated circuits and chassis ground.
- Cable and Wiring Systems: The test is applied between the conductor(s) and a water bath or metallic sheath in which the cable is immersed. A ramp function on the WB2671A is vital here to slowly charge the cable’s inherent capacitance.
- Medical Devices: Extremely low leakage current limits are mandated (e.g., 10 µA for patient-applied parts). The tester’s high resolution and accuracy in the microamp range are non-negotiable for compliance with IEC 60601-1.
Step-by-Step Test Procedure for a Generic Household Appliance
The following procedure outlines a generalized yet detailed methodology for performing a type approval withstand voltage test on a Class I household appliance, such as an electric kettle.
-
Preparation and Pre-Test Conditions:
- Ensure the test is conducted in a controlled environment, typically at 23°C ±5°C and relative humidity below 75%.
- Verify the calibration status of the WB2671A tester. Connect the high-voltage output lead to the test fixture or probe. Connect the return lead to the appliance’s earth terminal. Ensure the appliance’s power switch is in the “ON” position.
- Place the appliance on an insulated surface. For plastic parts, attach conductive foil to accessible surfaces and connect this foil to the earth terminal for testing.
-
Parameter Configuration on the Test Instrument:
- Power on the WB2671A and navigate to the parameter setting menu.
- Set Test Mode to “AC Withstand” (or “DC Withstand” if specified).
- Set Voltage to the required value (e.g., 1250 V AC as per clause 16.3 of IEC 60335-1 for basic insulation).
- Set Ramp Time to 5 seconds to gradually apply voltage.
- Set Dwell Time to 60 seconds for a type test.
- Set Trip Current to the standard-specified limit, commonly 100 mA for general appliances.
- Enable Arc Detection at a medium sensitivity level.
-
Test Execution and Safety Protocol:
- Activate the safety interlock circuit (if present). Press the “Start” button. The instrument will automatically ramp the voltage from 0V to 1250V over 5 seconds.
- Observe the real-time leakage current display. A stable current reading, often in the range of a few microamps to a few milliamps due to capacitive coupling, is expected.
- Maintain a safe distance during the 60-second dwell period. The WB2671A will continuously monitor for any current excursion exceeding the 100 mA limit or for transient arcs.
-
Post-Test Evaluation and Data Recording:
- Upon successful completion, the instrument will ramp down the voltage to zero and indicate a “PASS” on its display. Record the final leakage current reading.
- If a failure occurs, the instrument will immediately shut off the high voltage, sound an alarm, and indicate “FAIL.” Record the failure mode (over-current or arc).
- De-energize the setup, discharge any stored capacitive energy using a grounding stick, and then disconnect the appliance.
- Document all parameters, results, and any anomalies in the test report. A failure necessitates design review and corrective action before retesting.
Interpretation of Results and Failure Analysis
A “PASS” result confirms the insulation system’s integrity at the time of testing. The recorded leakage current value can serve as a benchmark for future comparative or trending analysis during production. A gradual increase in leakage current over successive production batches may indicate a process issue, such as contamination or inadequate curing of insulating materials.
A “FAIL” result demands rigorous root-cause analysis. Common causes include:
- Insufficient Creepage/Clearance Distances: PCB design flaws where conductive traces are too close.
- Material Defects: Voids, cracks, or impurities in plastic enclosures or insulating barriers.
- Assembly Errors: Pinched wires, stray solder balls, or incorrect placement of insulating sleeves.
- Environmental Contamination: Presence of moisture, dust, or flux residue on PCBAs.
Competitive Advantages of Modern Integrated Test Systems
Legacy hipot testers often required external oscilloscopes for arc detection and manual recording of results. Modern systems like the LISUN WB2671A consolidate these functions, offering distinct advantages:
- Enhanced Diagnostic Capability: Integrated arc detection provides deeper insight into insulation quality than simple current threshold monitoring alone.
- Improved Traceability: Automated storage of test parameters, results, and timestamps facilitates compliance with quality management systems (ISO 9001) and simplifies audit processes.
- Operational Safety: Features like zero-start interlock (voltage cannot be output unless starting from 0V), automatic voltage discharge, and emergency stop buttons protect both the operator and the device under test.
- Production Efficiency: Programmable sequences and handler interfaces (START/STOP remote terminals) allow for seamless integration into automated production test stations, crucial for high-volume manufacturers of components like connectors or power supplies.
Conclusion
The dielectric withstand voltage test remains an indispensable pillar of electrical product safety. Its proper execution—guided by relevant standards, precise instrumentation, and a methodical procedure—provides a high degree of confidence that a product will not pose an electrical shock hazard throughout its service life. As products become more compact and incorporate advanced materials, the role of sophisticated, reliable test equipment like the WB2671A becomes increasingly critical. It enables manufacturers to not only meet compliance mandates but also to implement proactive quality control, ultimately ensuring the safety and reliability of the electrical ecosystem within the modern home.
FAQ Section
Q1: Can the WB2671A be used for both AC and DC withstand voltage testing, and what are the key considerations when choosing between them?
A1: Yes, the WB2671A provides both AC and DC high-voltage output. The choice depends on the product standard and the device under test (DUT). AC testing is generally preferred as it stresses insulation in both polarities. DC testing is used for DUTs with high intrinsic capacitance (e.g., long cables, large filter capacitors) because it eliminates the large, non-hazardous capacitive charging current seen with AC, allowing for a more accurate measurement of resistive leakage current. The equivalent DC test voltage is typically the peak of the specified AC voltage (AC value × √2).
Q2: How is the “Trip Current” limit determined, and what happens if it is set incorrectly?
A2: The trip current limit is specified in the applicable safety standard for the product (e.g., 100 mA for many household appliances, 0.5 mA for medical devices). It represents the maximum allowable leakage current before a failure is declared. Setting it too high may allow a product with degraded but not yet catastrophic insulation to pass, creating a safety risk. Setting it too low may cause good products to fail unnecessarily due to normal capacitive leakage, increasing production cost and yield loss.
Q3: What is the purpose of the “ramp time” function, and is it always necessary?
A3: The ramp time (or voltage rise time) allows the test voltage to be applied gradually from zero to the target value over a set period (e.g., 5 seconds). This is crucial for testing capacitive loads. A sudden application of high voltage can cause a large inrush charging current that may exceed the trip limit, causing a false failure. A controlled ramp allows the capacitance to charge smoothly, after which the steady-state leakage current can be accurately measured.
Q4: Our product failed a hipot test. After investigation and a minor repair, it passes. Is this sufficient for release?
A4: Not necessarily. A single failure and repair may address the symptom but not the root cause, especially in production. The incident should trigger a formal corrective action process (e.g., 8D report). The repaired unit should undergo a full suite of relevant safety tests (not just re-hipot). Furthermore, other units from the same production batch should be subjected to increased sampling and testing to rule out a systemic issue. The root cause (design, component, or process) must be identified and permanently corrected.